Margin e Padding
Se a cor é o primeiro passo na prototipação do CSS, os espaçamentos são o segundo.
Aqui temos dois tipos de classes utilitárias que usamos: margin e padding. Para elas, as classes são m e p, respectivamente.
Para elas, podemos definir:
- O espaçamento de todos os 4 lados, usando
p-*,m-*em que*substituímos pelo sistema de medidas. - O espaçamento do eixo horizontal (
px-*,mx-*) ou do eixo vertical (py-*,my-*). - O espaçamento de apenas um dos lados:
pr-*,mr-*(direita - right)pl-*,ml-*(esquerda - left)pt-*,mt-*(topo - top)pb-*,mb-*(base - bottom)
Margens Negativas
No TailwindCSS, é possível usar margens negativas (-m-*). Por exemplo, -mt-4 aplica uma margem superior negativa de -16px, puxando o elemento para cima.
Exercício 03a
O mesmo exercício que o anterior, só que dessa vez vamos usar margin e padding.
Código Inicial
<!doctype html><html lang="en"> <head> <meta charset="UTF-8" /> <meta name="viewport" content="width=device-width, initial-scale=1.0" /> <title>Exercício 02</title> <link href="../tailwind.css" rel="stylesheet" /> </head> <body class="flex min-h-screen items-center justify-center bg-gray-100"> <div class="rounded bg-white"> <button class="rounded bg-fuchsia-800 text-white">Inscreva-se</button> <button class="rounded border border-fuchsia-300 bg-fuchsia-200 text-fuchsia-900" > Sair </button> </div> </body></html>Resolução do Exercício 03a
<!doctype html><html lang="en"> <head> <meta charset="UTF-8" /> <meta name="viewport" content="width=device-width, initial-scale=1.0" /> <title>Exercício 02</title> <link href="../tailwind.css" rel="stylesheet" /> </head> <body class="flex min-h-screen items-center justify-center bg-gray-100"> <div class="flex gap-4 rounded bg-white px-10 py-6"> <button class="rounded bg-fuchsia-800 px-6 py-2 text-white"> Inscreva-se </button> <button class="rounded border border-fuchsia-300 bg-fuchsia-200 px-6 py-2 text-fuchsia-900" > Sair </button> </div> </body></html>Exercício 03b
Copie e cole o HTML abaixo em um arquivo novo chamado exercicio03.html.
Precisamos deixar o formulário mais ou menos igual à imagem abaixo. Utilize as classes de espaçamento para isso.
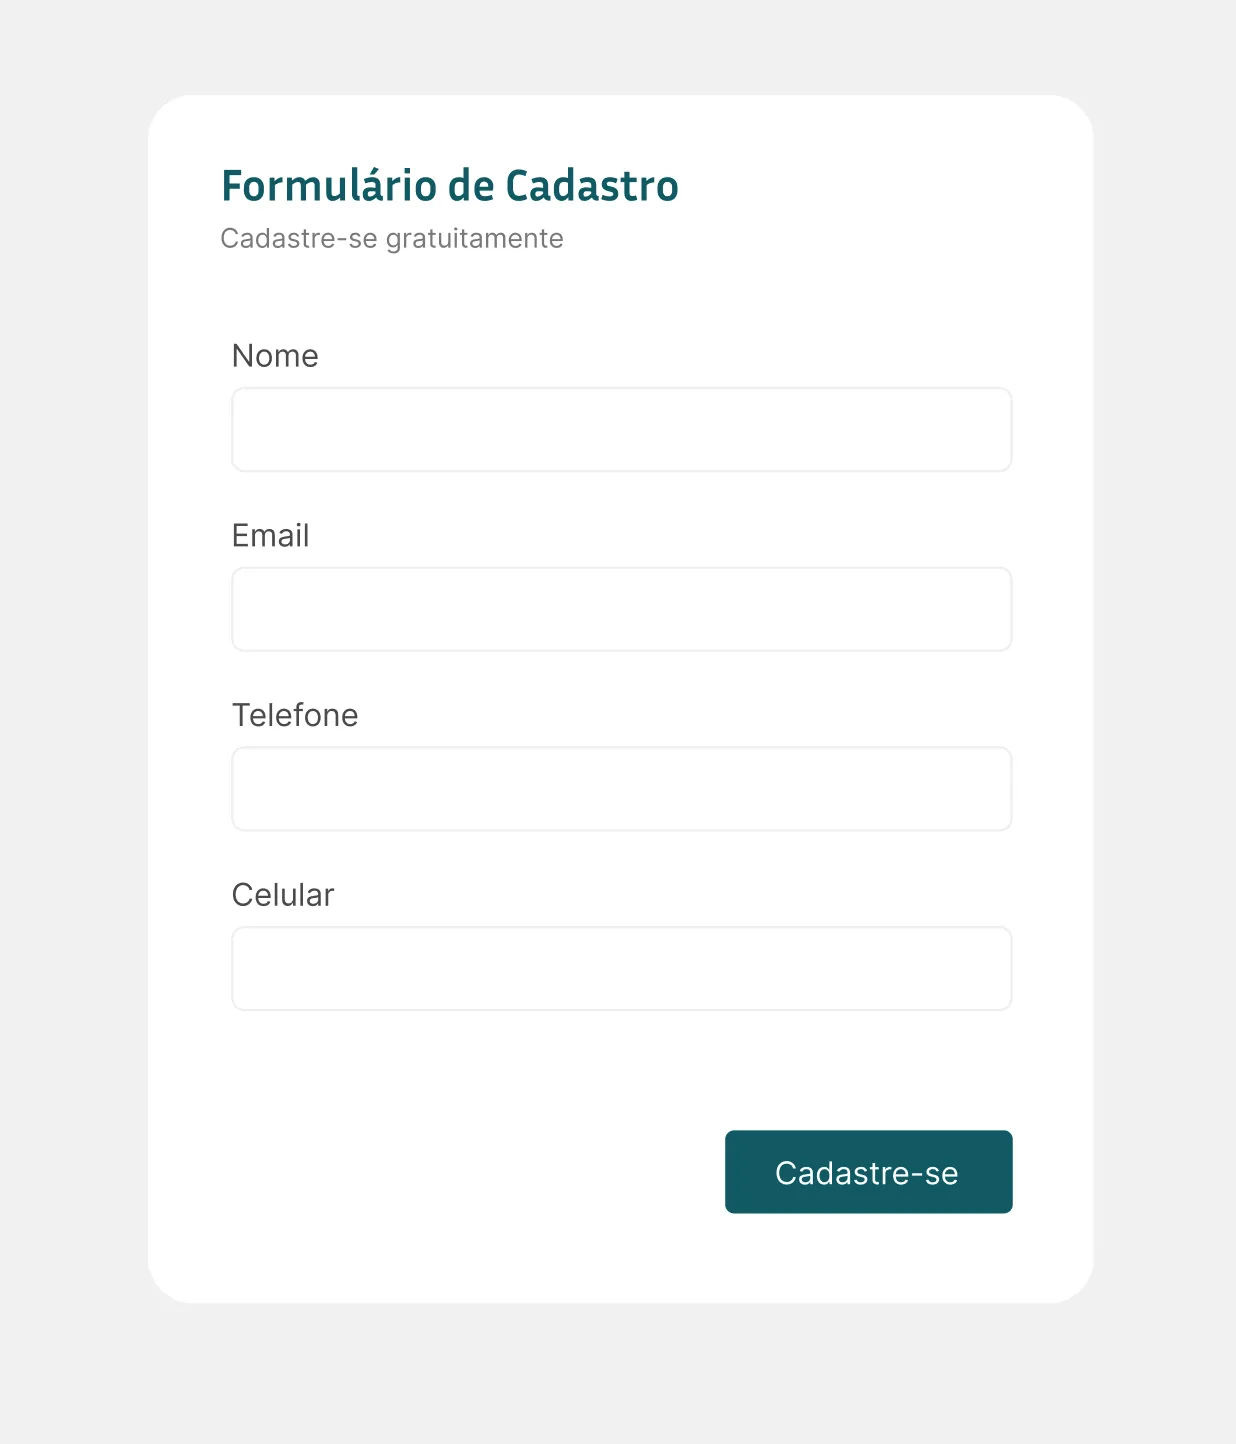
Dessa vez o código vai ser mais simples, sem os formulários e os botões, apenas com a div interna branca. Você deverá montar todo o restante.
Código inicial do Exercício 03b
<!doctype html><html lang="en"> <head> <meta charset="UTF-8" /> <meta name="viewport" content="width=device-width, initial-scale=1.0" /> <title>Exercício 03b</title> <link href="../tailwind.css" rel="stylesheet" /> </head> <body class="flex min-h-screen items-center justify-center"> <div class="bg-white"></div> </body></html>Resolução do Exercício 03b
<!doctype html><html lang="en"> <head> <meta charset="UTF-8" /> <meta name="viewport" content="width=device-width, initial-scale=1.0" /> <title>Exercício 03b</title> <link href="../tailwind.css" rel="stylesheet" /> </head> <body class="flex min-h-screen items-center justify-center bg-gray-200"> <div class="flex min-w-md flex-col rounded-xl bg-white p-10"> <h2 class="font-display text-2xl font-bold text-teal-800"> Formulário de Cadastro </h2> <p class="text-sm text-gray-500">Cadastre-se gratuitamente</p> <div class="my-12 flex flex-col space-y-6"> <div class="flex flex-col"> <label class="mb-1 text-sm text-gray-600" for="name">Nome</label> <input class="rounded-lg border border-gray-300 px-2 py-2.5" id="name" type="text" /> </div> <div class="flex flex-col"> <label class="mb-1 text-sm text-gray-600" for="email">Email</label> <input class="rounded-lg border border-gray-300 px-2 py-2.5" id="email" type="email" /> </div> <div class="flex flex-col"> <label class="mb-1 text-sm text-gray-600" for="phone">Telefone</label> <input class="rounded-lg border border-gray-300 px-2 py-2.5" id="phone" type="text" /> </div> <div class="flex flex-col"> <label class="mb-1 text-sm text-gray-600" for="mobile">Celular</label> <input class="rounded-lg border border-gray-300 px-2 py-2.5" id="mobile" type="text" /> </div> </div> <button class="self-end rounded bg-teal-800 px-6 py-2 text-white"> Inscreva-se </button> </div> </body></html>